Monthly Archives: February 2013

MAC HARMONY: Best Contour for Fair Skin!

I purchased Harmony because I read that it made for a great contour on fair skin. I must say that it is very different using a blush to contour, but it gave me awesome results!

Harmony is a very pigmented rosy brownish color, as you can see in the swatches below. There are absolutely no orange tones in this blush which is why it is great for ladies with fair skin. I used a VERY light hand, and it gave the most beautiful subtle contour. Before trying Harmony, I would use Benefit’s Hoola to contour. The texture of Hoola and Harmony is quite different. They are both matte but Harmony was more finely milled and less powdery. Typically a bronzer will be a bit more powdery than blush, so that was to be expected. You just have to change your technique when applying it. I used very little product on a MAC 109 and took my time blending.

A couple negatives: I don’t think it would be good for overall bronzing, and I will continue to use my beloved Hoola for that. Also, the rosy color may make certain blushes look strange when paired with it.

To be honest I don’t think contouring is practical for everyday, but it’s great for special occasions or going out on the weekends. If you are in the market for a great matte contour color I would definitely recommend Harmony.

On a side note, I would like to tell all the fair/light skinned ladies out there that I would NOT recommend Tarte’s Park Avenue Princess Matte Bronzer shown in the swatches below. It shows up INCREDIBLY orangey on my fair skin… but that’s just my opinion 🙂
Please click to enlarge.


I hope that was helpful and don’t forget to subscribe!


-Sarah


MAC WELL DRESSED

Well Dressed is the quintessential baby pink that every girl should have in her collection! It has a Satin finish and gives the most gorgeous subtle sheen when applied to the cheek. Although the picture above may look a little dark, it is completely true to color. You can also see the silver micro shimmer that runs through it.

MAC Well Dressed vs Tarte Dollface

I’ve heard many times that Well Dressed and Tarte’s Dollface were dupes, but I have to disagree. They differ in finish, pigmentation, and color. In the swatches above I did three passes with Dollface, and at least ten with Well Dressed. It is not a very pigmented blush, and I would only recommend it to ladies with fair, light, and some medium skin.

I typically only purchase matte blushes but this is one of the few exceptions! You do have to build up the color, but like I have said before, I prefer it that way. I can be a little too heavy handed with blush sometimes, and it’s hard to mess up when using Well Dressed.

I hope this was helpful, and don’t forget to subscribe!

Do you have Well Dressed or Dollface?


MAC MELBA VS PEACHES — Blush Review and Swatches


Melba has a matte finish and is extremely pigmented. In the swatches above I only did two passes on my arm to get that degree of opacity. Not only is it super pigmented, but I find that it blends easily and stays put all day long. As compared to Peaches, Melba has more brown and pink tones. Unlike Peaches, I don’t think this blush appears too orange on super fair gals.


Peaches is a Sheertone blush — meaning you have to build up the color. In the swatch above, I did about 10 passes to get the color shown. Because it isn’t as pigmented, you can be a bit more heavy handed and not look like a fool. This blush is a true peach when applied. I think it is gorgeous on most skintones but can look a little too orangey on very fair ladies.


Honestly I love Peaches and Melba, but I don’t think it is necessary to have both. If I had to pick just one, I would go with Melba. The main difference between the two is pigmentation and staying power. You can get very similar results using either of them… you just have to adjust your technique. I think Peaches is great for beginners because it is hard to mess up. Melba, on the other hand, can be easily overdone — and nobody likes 80’s style clown streaks! Or maybe they do…
 
 
 Do you have Peaches or Melba?
 
 
I hope this was helpful and don’t forget to subscribe!!
 
 
-Sarah


MAC Prep+Prime Fortified Skin Illuminateur in Neutralize

MAC has a vast collection of Prep+Prime products and today I’m going to be reviewing their Fortified Skin Illuminateur in Neutralize. When purchasing a product from this line, the most important thing to do is look on the box for the active ingredients and uses. The word primer has a lot of different meanings, and you should decide what you would like your primer to do — moisturize, oil control, fill in pores, sunscreen, etc. Neutralize has five active ingredients, all of which are for sunscreen benefits, so it will not help in controlling excess oil. Along with protecting skin from the sun, this product claims to neutralize redness and illuminate the skin.

As you can see the product is very yellow, and this helps to neutralize redness. The illumination properties come from the large amounts of sunscreen in the product. I do see a difference in redness reduction when I use this product, but the I don’t find that my skin is anymore illuminated once I have my foundation on. I use MAC Studio Fix Powder Foundation most of the time because I have oily skin and this product works beautifully under it. If you have ever used MAC SFP you know that it can look pretty powdery when first applied. When I use Neutralize under it I find the coverage to be much more even, less powdery, and it even lasts longer.

On with a couple negatives… I cannot use this under liquid foundation because there aren’t any oil reduction ingredients, so this wouldn’t be something I recommend to ladies with super oily skin. Also, because of all the sunscreen in the product, you should not use it if you will be photographed — it will cause your face to be washed out and much whiter than your body in the photos.

I think that this is a great product for use under powder foundation and I will be repurchasing when I run out. I love that it reduces redness, protects my skin from the sun, and helps my powder foundation apply evenly and last longer! On a side note, I think that it is important to be realistic with our expectations of facial products and primers. I read a bunch of negative reviews on Neutralize because they were expecting it do things the product was not made to do. When making a purchase, always read what the products is used for and the active ingredients!

Thank you so much for reading and don’t forget to subscribe!!

Have you tried any Prep + Prime products? What is your favorite primer?


BATTLE OF THE TAUPES

I ADORE taupes… every time I see one I try to justify why I need another. While doing this post I have decided that I am on an official “NO BUY” for taupes until I use up two of these completely! There are a couple close dupes… I hope you enjoy!


PLEASE CLICK TO ENLARGE

From Left to Right: Tarte Bamboo, MAC Satin Taupe, UD Stray Dog, Wet N’ Wild Nutty, Loreal Infallible Bronzed Taupe, UD YDK

Here’s the verdict: Tarte’s cream eyeshadow in Bamboo is an exact dupe to Loreal Infallible Eyeshadow in Bronzed Taupe. Wet N’ Wild’s Nutty was a very close dupe to UD YDK but YDK has a lot more glitter — they are both the warmest taupes. MAC’s Satin Taupe has a purple undertone, and UD Stray Dog is the brownest of the bunch.

Who’s the winner? My favorite is MAC’s Satin Taupe because the purple undertone really brings out my green eyes. The runner up is Bronzed Taupe by Loreal — I just LOVE the texture of the Infallible Eyeshadows and the color of this one is just gorgeous!


I hope this was helpful and don’t forget to subscribe!

-Sarah


NEW MAC Pro Palette: Large Duo (Double Sided) Review

 
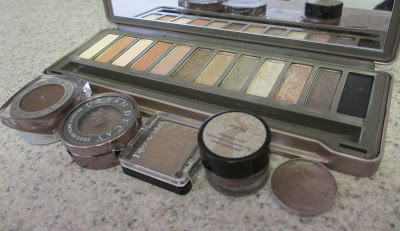
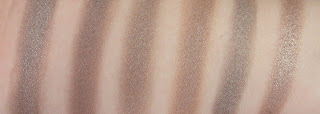
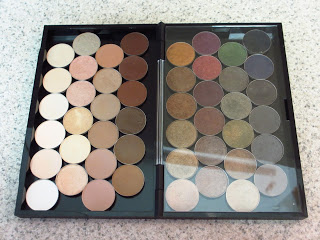
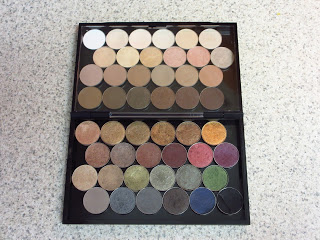
Without Dividers (48 eyeshadows)
(L-R) Gesso, Blanc Type, Vanilla, Mylar, Brule, Shroom
Dazzlelight, Nylon, Ricepaper, Naked Lunch, Jest, Vex
Malt, Kid, Wedge, Omega, Era, Soft Brown
Cork, Espresso, Brun, Brown Down, Handwritten, Embark

All That Glitters, Woodwinked, Tempting, Bronze, Mulch, Amber Lights
Sable, Satin Taupe, Twinks, Sketch, Cranberry, Nocturnelle
Jaunty (LE), Patina, Sumptuous Olive, Greensmoke, Club, Humid
Copperplate, Knight Divine, Print, Smut, Contrast, Carbon


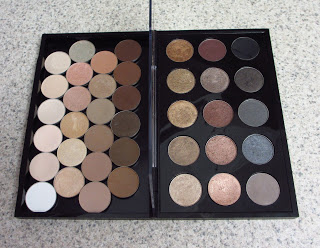
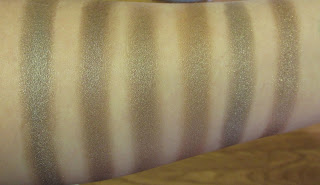
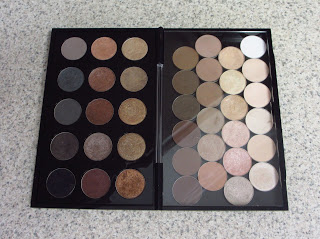
With one divider (39 Eyeshadows)


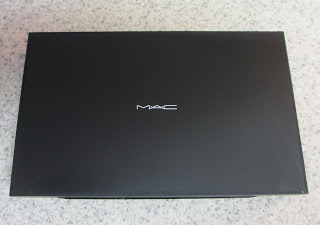
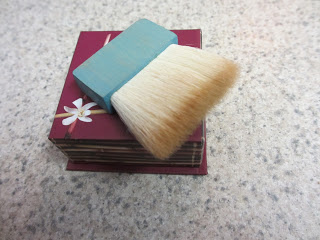
The long awaited MAC LARGE DUO (Double Sided) PRO PALETTE has finally arrived at my home and I can hardly control my excitement long enough to write this review! I know this may look like a short novel, but what can I say? I’m thorough!

Oh dear Lord, where do I begin? Let me just say that I am in love! I think that it looks sleek, sophisticated and a definite upgrade from the old palettes. And while I do think the palette is a success overall, I also have a couple complaints…

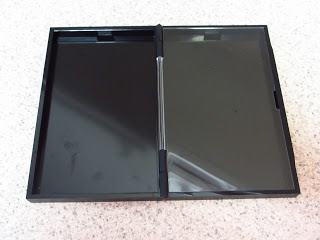
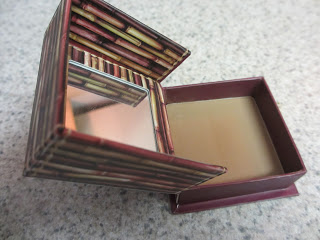
The Palette is about 3.5 times thicker than the old MAC palettes and about a half inch smaller in height and width. It is made of high quality plastic and does not have a see through lid like the new Pro Palette Single. The plastic seems to be a lot sturdier than the old ones, in addition to a more professional appearance.

The palette does not have a snap closure, rather it is held together magnetically. This is one of my favorite features because the closures of old the palettes would wear out. The magnet holds it together snugly, but I do not find it overly difficult to open. The magnetic pull isn’t so strong that you pinch your fingers… Inglot palettes I’m looking at you! There is a clear plastic shield that can be moved to either side. I understand that it is a necessary component to protect the eyeshadows, but it isn’t easy to move back and forth — which is super annoying when you are trying to do a look!

You can choose to purchase dividers which will hold either 15 eyeshadows, 6 blushes, 12 lipsticks, or 24 cream products… Or you can leave the dividers out! Without the divider each side holds 24 eyeshadows for a total of 48 in the entire palette — or you can put one divider in like I did in the last two pictures for a total of 39 eyeshadows.  Also note that when you use the dividers it is difficult to get the eyeshadows out. They do not have the grooves that the old palettes have.

When I purchased the palette online I thought that at least one side would need a divider (the side being stored upside down), but to my surprise the metal plate inside the palette is quite strong — much stronger than the old palettes! I feel comfortable leaving the divider out of both sides because I don’t travel with my palettes. If you travel or you are a bit clumsy, you may want to invest in some dividers.

On with the pics! Please click to enlarge.

WITH NO DIVIDERS (48 Eyeshadows)


WITH ONE DIVIDER (39 Eyeshadows)


The price of the palette is $25 and each divider is $9… so to buy the palette and two dividers you’re looking at $43!! That’s a lot of money for a palette! That is why I am advocating divider free palettes. They are available online (click HERE) and at PRO stores. I’m not sure if they are going to be sold at regular free standing stores, but as soon as I know I will update the post.

Originally I was pretty pissed off that MAC switched the palettes because I am somewhat of an organization freak and like everything to match. I was also upset that they were more expensive! But after receiving the product and realizing you don’t need the dividers, I couldn’t be more thrilled! If you are like me and have A LOT of eyeshadows, this ends up being cheaper. Rather than having 15/26 eyeshadows in the old MAC palettes, I can have 48! I think it looks more professional, and I LOVE having all my neutrals in one palette!

****UPDATE****
After having the palette for three days, I have had two eyeshadows fall down onto the clear shield — nothing broke, but I am lowering my rating! The ones that fell were on the side with no dividers. Pretty big disappointment, but I am still going to leave the dividers out and just be more careful.

If you are new to MAC please note:
Neither the palette nor the dividers are magnetized, so the eyeshadows need to be… Inside the palette is a peice of metal and if you choose to depot your eyeshadows, you will need to glue a small magnet to the back of them. I like to purchase the eyeshadows in pro pan form from their website, because they come with the magnet already attached — much easier, and cheaper!

I give this palette an   B+!!


Thanks for reading and don’t forget to subscribe!

-Sarah


Benefit Hoola — Best Bronzer for Fair/Light Skin

If you are a fair skinned gal then you know what a daunting (and expensive) task it can be to find a bronzer that isn’t too orange, red, or dark. Well look no further ladies! Hoola Bronzer by Benefit is the perfect bronzer for cool toned skin in the fair/light category.

I have tried so many different bronzers, each with it’s fault, but not Hoola! I don’t like to use the word universal, but I think this could work on most women with fair/light skin.


Hoola has a smooth texture, just the right amount of pigment, blends nicely and the powder is finely milled. Along with overall bronzing it can also be used to contour, as it has a matte finish. The brush that it comes with is great if you want a really strong contour, but it doesn’t do general bronzing well. I like to use a MAC 168 or a Real Techniques Blush Brush to apply.

You can find Hoola and all other Benefit products at Sephora and Ulta!

What is your favorite bronzer?

-Sarah


TOP 5 MAC EYE BRUSHES

It’s no secret that MAC Brushes are a bit pricey, but they are definitely an investment! I’ve had a couple of them for about 10 years and they still look brand new. I am a sucker for their eye brushes because I think they are the best ones out there.

MY TOP 5

MAC 217 – Blending Brush

The most perfect, amazing, phenomenal creation ever made! Seriously. I could not live without this brush! It is perfect for blending, applying crease color, applying lid color, and it can even walk on water! This goat hair extraordinaire is worth EVERY penny. I love it so much I have a spare!

MAC 239 — Flat Shader Brush

This baby packs on lid color like no other and can also smudge out liner. Because it is made of densely packed goat hair the brush doesn’t eat up a lot of the shadow like most flat shaders do.

MAC 219 — Pencil Brush

I used to despise pencil brushes because they were too scratchy… until I got my beloved 219. I use this to smudge pencil liner and to apply shadow to the lower lash line.

MAC 224 — Blending Brush

It took a little while for me to love this brush, but now it is a dear, dear friend. I use it to apply my transition and to blend out any harsh lines. If you have smaller eyes this may not be the best choice for you, and I must admit that it does shed from time to time.

MAC 208 — Small Angled Brush

I love this little baby for its versatility and multi-functionality! It is perfect for eyebrows and applying shadow to the lash line. Some gals like to use it to apply gel liner. It is small, compact, and densely packed. Love this brush!

These are the Top 5 I could not live without! Do you own any MAC brushes? Which are your favorite?

DON’T FORGET TO SUBSCRIBE! LOVE YA!

-Sarah

I have included a list of all the eye brushes I own to help give a point of reference:

MAC 208
MAC 210
MAC 213
MAC 214
MAC 217
MAC 219
MAC 224
MAC 226
MAC 227
MAC 239
MAC 266
MAC 275


Revlon Colorstay Liquid Foundation Review

I’ve been trying out this foundation for last couple weeks so that I could give an accurate review, and I am really pleased with the product! Here’s my two cents on Revlon Colorstay Liquid Foundation!

I didn’t find a 100% match to my skintone but I ended up going with 150 Buff, which was one of their lightest shades. Unfortunately it was slightly grey colored — but this is a common problem with fair drugstore foundations. Luckily this was the only con I found with the product. Although I did wear this foundation on its own for the sake of the review, I ended up mixing it with a more pinky foundation that I had to make the perfect shade.

It is important to note that there are two different kinds of Revlon Colorstay: one for oily skin and one for dry skin. I purchased the one for oily skin skin because it has a matte finish; I still recommend using powder because it didn’t fully set without it. I would say that it has medium to full coverage and is definitely buildable. It went on smoothly and evenly, but the drying time was pretty short — so you have to work fast! Revlon claims that it lasts 24 hours, but I wear foundation for a maximum of 8 hours so I can’t really confirm or dispute that assertion. When worn over a primer this foundation was still going strong 8 hours later. Because of the matte finish, make sure that your skin is moisturized prior to applying because it can appear a little cakey. Ladies with dry skin, proceed with caution.

I wish that it came with a pump, but that won’t keep me from repurchasing when I run out. I like to apply it with a Real Techniques Stippling Brush because it helped to sheer out the coverage and really buff it into the skin. Overall I am extremely pleased with my purchase and you can’t beat the price! I think I paid $9.97. If you are in the market for a foundation try Revlon Colorstay and let me know what you think!

DON’T FORGET TO SUBSCRIBE! LOVE YA!

-Sarah


MAC FOUNDATIONS and UNDERTONES

When purchasing a MAC foundation you will notice that each color has letters before the number, NC25 for example. The letters describe the undertone and the numbers tell you how deep the shade is. Although this may seem a little confusing, it is actually very helpful when trying to find your perfect shade.
 
 
MAC foundations are one of the following:
N — Neutral
NC — Neutral Cool (slightly yellow)
C — Cool (very yellow)
NW — Neutral Warm (slightly pink)
W — Warm (very pink)

I know what you’re thinking… “Why the hell are they calling a yellow foundation cool?” In reference to skintones many people think that cool undertones means pink based and warm undertones mean yellow based — well in the MAC world, reverse that!

According to MAC yellow undertones = cool, and pink undertones = warm. And here’s why:

According to Color Theory cool = blue, and warm = red.  It only makes sense to say that if you have pink undertones you are much closer to red in the color wheel and therefore warm toned. If you have more yellow/olive undertones then you are closer to blue and therefore cool toned.

I find the pink and yellow undertones in MAC foundations to be quite strong, even in the NC and NW shades! Unfortunately they don’t have the neutral (N) shades in many of their foundations.

A couple more points before I wrap it up… Make sure to get matched if you plan on switching foundations. If you are an NC30 in one foundation, you could be NC25 in another! Also, if you have a lot of facial redness like I do, I would suggest trying an NC foundation. Because it is slightly yellow, this will help to counteract the redness and can give a better result.

I know it can seem a little confusing, but hopefully this helped! Thanks for reading!